MrDoc User Guide
Basic concepts
MrDoc page description
2.1 Home page
2.2 Collection browsing page
2.3 Document browsing page
2.4 Document editing and modification
2.4.1 Creating a document
2.4.2 Modify document
2.4.3 Create document template
2.4.4 Modify document template
2.4.5 Brief introduction to Markdown syntax
2.4.7 Uploading attachments
2.4.8 Draw a mind map
2.5, Personal Center
2.5.1 Managing documents
2.5.2 Managing collections
2.5.3 Managing document templates
2.5.4 Managing images
2.5.5 Managing user tokens
2.7 Registration and login
2.7.1 User registration
2.7.2 User login
Getting started
Create collection
Create document
Add member collaboration
Documents and knowledge base basics
Collection basic configuration
Pin collection
WebHook message push
Hide collection on homepage
Collection association set
Collection tab configuration
Document editing and content creation
Add document attachments
Show document directory
Create document shortcut
Set document tags
Set document alias
Insert video
Automatic document saving
Document management and organization
Collection directory sorting
Modify document sorting
Subordinate document control
Set document parent-child
Document version history
Transfer collection
Transfer document
Copy document/Move document
Document access records
Collection export and download
Document download and export
Export document PDF
Document drag-and-drop sorting
Collaboration and permission management
Set document permissions
Set collection access permissions
Document copy protection
Set document watermark
Collection collaboration/Collection member management
Document sharing
Collection sharing
Enable document comments
Image and attachment management
Configure image/attachment upload size limit
Configure image upload formats
Configure attachment upload formats/attachment allowlist
Attachment preview
Transfer attachments/Transfer images
Clean up images
Extract attachment text in bulk with the manage command
Data import and migration
Desktop client import
Import Joplin notebooks
Import Evernote
Web import
Command-line import
Web export
Third-party login configuration
DingTalk QR code login and in-app passwordless login configuration
WeCom authentication integration
LDAP authentication integration configuration
OIDC authentication integration
WeChat Official Account web authorization
Third-party storage configuration
MinIO configuration
Qiniu Cloud OSS configuration
Alibaba Cloud OSS configuration
AWS S3 configuration
AI knowledge base and intelligent Q&A
Basic configuration
AI model configuration
Qdrant deployment
Dify framework configuration
Rebuild document AI index
AI features
AI document creation
AI knowledge base Q&A
AI Q&A bot
WeCom smart robot
OnlyOffice integration
Drawio integration
System settings and management
Site information configuration
Homepage template configuration
Official website theme homepage configuration instructions
User and account configuration
Statistics code configuration
Document ads/info blocks/custom head configuration
Disable update detection
Site-wide search mode
Display image thumbnails in documents
Site feedback
RSS subscription
Site single tag settings
Outbound email configuration
Site data export
Editor configuration
Collection documentation page displays site top navigation bar.
Site announcement configuration
Personal account management
Set default editor
Set user nickname
Modify user password
Bind a third-party account
API and developer interfaces
Get user token
Get collection list
Get collection directory
Get collection document list
Get personal document list
Get specified document content
Create new collection
Create a new document
Update documentation
Upload image
Upload attachments
Verify user token
Upload local Office/PDF files as documents
Client and ecosystem integration
Desktop client
Mobile client
Browser extensions
Obsidian plugins
Common usage issues index
Powered by MrDoc Pro
-
+
home
User and account configuration
# User and Account Configuration MrDoc supports configuration for features such as user registration and user login. The configuration path is: Open source edition: Admin Panel --> Site Settings Pro edition: Admin Panel --> Site Settings --> Basic Settings, as shown in the figure below: 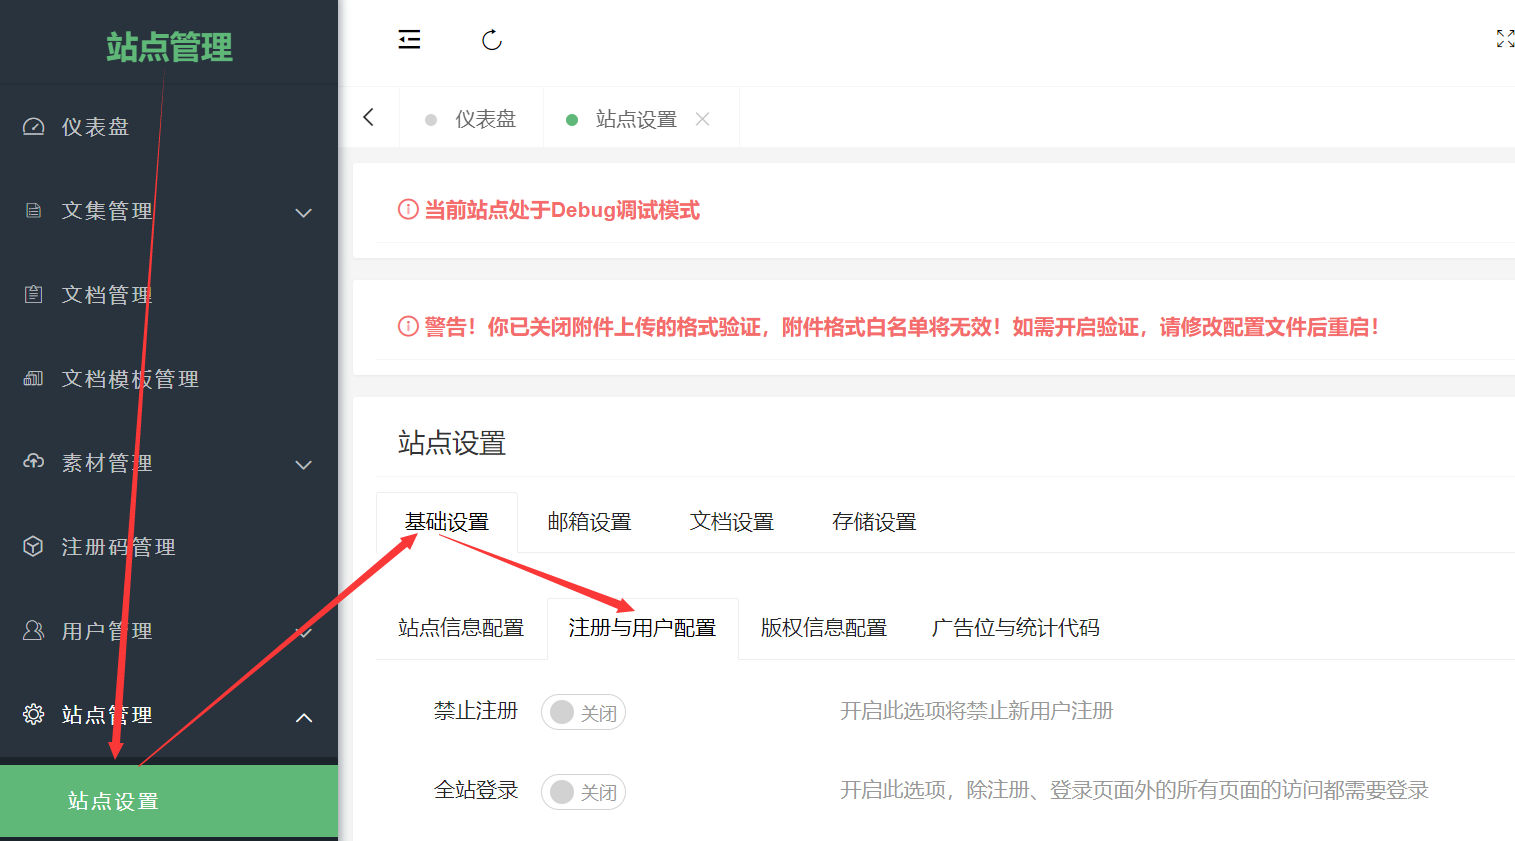 The following describes each configuration item. ## Default Login Method > d After setting another default login method, the system login page will be inaccessible, meaning the username + password login method will no longer be supported. The default login method of MrDoc is system username + password login. The Pro edition also supports third-party authentication such as DingTalk, WeCom, LDAP, and OIDC. After you configure these third-party authentications, the default system login page will display the corresponding third-party login icon buttons. If you want users to be redirected directly to the corresponding third-party login link after visiting the login page, you can set the default login method to the specified third-party login. ## Guest Entry Used to control the display/hiding of the login and registration menu links on the project list homepage and the help center homepage. After hiding the guest entry, if a login operation is needed, you must manually enter `/login` in the browser address bar to access the login page. ## Disable Registration If your site does not need to open registration for new users, you can enable the "Disable Registration" switch. After enabling this switch, the registration entry on the page will be closed, but administrators can still create accounts on the "User Management" page in the admin panel. ## Strong Password for Registration By default, MrDoc requires new user registration passwords to be no less than 6 characters and allows pure numbers. If your usage environment requires high-strength passwords, you can enable the "Strong Password for Registration" switch. After enabling this switch, the password rule for user registration is a length greater than or equal to 8, and it must contain uppercase letters, lowercase letters, numbers, and special symbols. ## Site-wide Login If you do not want guests (users who are not logged in) to access your site, you can enable the "Site-wide Login" switch. After enabling this feature, guests visiting site pages (except publicly shared projects and documents) will be redirected to the login page. ## Single Login After enabling single login, a user cannot be online in multiple places at the same time. After logging in at one place, other login sessions will be forcibly logged out. ## Registration Code If your site allows user registration but with certain restrictions, you can enable the "Registration Code" feature. After enabling this feature, users must enter a registration code to register successfully. Registration codes are created and managed on the "Registration Code Management" page in the "Admin Panel". ## Registration Code Prompt Used to provide a web link that tells users how to obtain a registration code. If left blank, it will not be displayed. ## Registration Email Verification > d This feature requires email sending configuration in the admin panel. By default, users can enter any email address during registration. If you need to verify the email address entered by users, you can enable the "Registration Email Verification" switch. After enabling this feature, when a user enters an email address during registration, a verification email will be sent, and the user must enter the correct email verification code to complete registration. ## Login Captcha By default, users only need to enter a username and password to log in. If you need users to enter a captcha when logging in, you can enable the "Login Captcha" switch. After enabling this feature, users will need to enter a username, password, and captcha when logging in. ## New User Permissions >i This configuration affects the read and write permissions of all new users, including those from third-party login integrations. Under the default configuration, new users only have "read-only" permission after registration. You can configure it as "read-write" permission, and then separately control the permissions of new users for projects, documents, images, and attachments. ## Default User Group for New Users After registration, new users have no user group by default. In many cases, the collaboration or browsing permissions of some projects are limited to certain user groups, so you can specify the user group that new users join by default. In this way, after new users register, you do not need to manually add them to the user group.
mrdoc
Sept. 29, 2026, 6:42 p.m.
Forward
Favorites
Last
Next
Scan the QR Code
Copy link
Scan the QR code to share.
Copy link
share
link
type
password
Update password
Validity period
Markdown file
Word document
PDF document (print)