MrDoc User Guide
Basic concepts
MrDoc page description
2.1 Home page
2.2 Collection browsing page
2.3 Document browsing page
2.4 Document editing and modification
2.4.1 Creating a document
2.4.2 Modify document
2.4.3 Create document template
2.4.4 Modify document template
2.4.5 Brief introduction to Markdown syntax
2.4.7 Uploading attachments
2.4.8 Draw a mind map
2.5, Personal Center
2.5.1 Managing documents
2.5.2 Managing collections
2.5.3 Managing document templates
2.5.4 Managing images
2.5.5 Managing user tokens
2.7 Registration and login
2.7.1 User registration
2.7.2 User login
Getting started
Create collection
Create document
Add member collaboration
Documents and knowledge base basics
Collection basic configuration
Pin collection
WebHook message push
Hide collection on homepage
Collection association set
Collection tab configuration
Document editing and content creation
Add document attachments
Show document directory
Create document shortcut
Set document tags
Set document alias
Insert video
Automatic document saving
Document management and organization
Collection directory sorting
Modify document sorting
Subordinate document control
Set document parent-child
Document version history
Transfer collection
Transfer document
Copy document/Move document
Document access records
Collection export and download
Document download and export
Export document PDF
Document drag-and-drop sorting
Collaboration and permission management
Set document permissions
Set collection access permissions
Document copy protection
Set document watermark
Collection collaboration/Collection member management
Document sharing
Collection sharing
Enable document comments
Image and attachment management
Configure image/attachment upload size limit
Configure image upload formats
Configure attachment upload formats/attachment allowlist
Attachment preview
Transfer attachments/Transfer images
Clean up images
Extract attachment text in bulk with the manage command
Data import and migration
Desktop client import
Import Joplin notebooks
Import Evernote
Web import
Command-line import
Web export
Third-party login configuration
DingTalk QR code login and in-app passwordless login configuration
WeCom authentication integration
LDAP authentication integration configuration
OIDC authentication integration
WeChat Official Account web authorization
Third-party storage configuration
MinIO configuration
Qiniu Cloud OSS configuration
Alibaba Cloud OSS configuration
AWS S3 configuration
AI knowledge base and intelligent Q&A
Basic configuration
AI model configuration
Qdrant deployment
Dify framework configuration
Rebuild document AI index
AI features
AI document creation
AI knowledge base Q&A
AI Q&A bot
WeCom smart robot
OnlyOffice integration
Drawio integration
System settings and management
Site information configuration
Homepage template configuration
Official website theme homepage configuration instructions
User and account configuration
Statistics code configuration
Document ads/info blocks/custom head configuration
Disable update detection
Site-wide search mode
Display image thumbnails in documents
Site feedback
RSS subscription
Site single tag settings
Outbound email configuration
Site data export
Editor configuration
Collection documentation page displays site top navigation bar.
Site announcement configuration
Personal account management
Set default editor
Set user nickname
Modify user password
Bind a third-party account
API and developer interfaces
Get user token
Get collection list
Get collection directory
Get collection document list
Get personal document list
Get specified document content
Create new collection
Create a new document
Update documentation
Upload image
Upload attachments
Verify user token
Upload local Office/PDF files as documents
Client and ecosystem integration
Desktop client
Mobile client
Browser extensions
Obsidian plugins
Common usage issues index
Powered by MrDoc Pro
-
+
home
OIDC authentication integration
# OIDC Authentication Integration The following uses Keycloak as an example to describe how to integrate OIDC authentication in MrDoc. ## Keycloak Configuration ### Realm In this demonstration environment, we have created a realm named "mrdoc":  ### Client Then, within the "mrdoc" realm, create a client of type "OpenID Connect", with the client ID set to "mrdoc-oidc":  Then configure the mrdoc-oidc client. In "Access settings", fill in your MrDoc-related URLs:  In "Capability config", enable "Client authentication" and "Authorization":  After setting these up, save the configuration. ### Client Credentials On the mrdoc-oidc client configuration page, switch to the "Credentials" tab and obtain the "Client secret" for later use:  ## MrDoc Configuration Go to the "Third-party login" section in the admin page, switch to the "OIDC" tab, and click the "Add OIDC Provider" button: 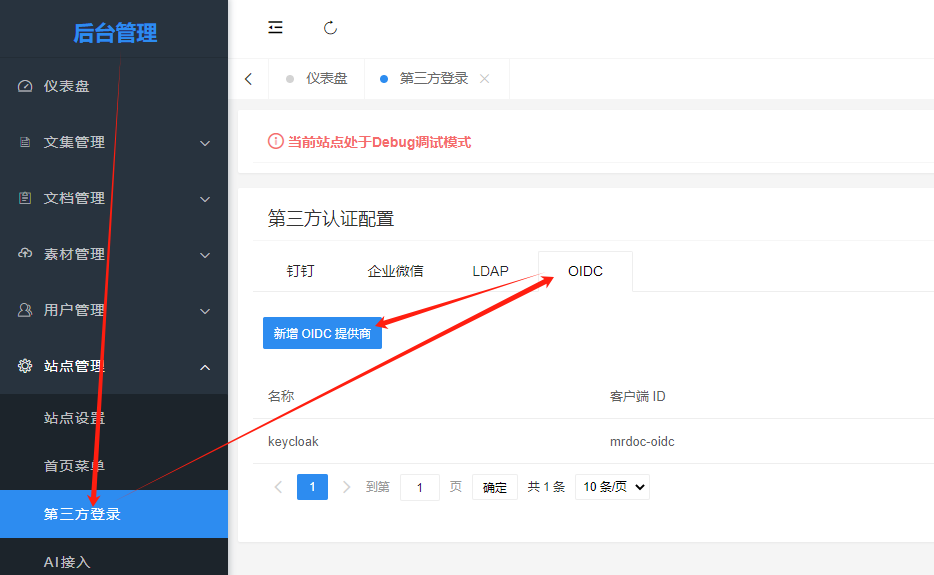 In the popup, enter the corresponding information for the OIDC provider:  Where: - Name: used to identify the OIDC provider, and must be unique within MrDoc. - Client ID: the client ID created in Keycloak. - Client secret: the "Client secret" in the "Credentials" tab of the client in Keycloak. - Metadata URL: in Keycloak, the metadata URL is usually: `{OIDC service URL}/realms/{realm name}/.well-known/openid-configuration` Therefore, based on the Keycloak configuration above, configure the OIDC provider information here as follows:  After configuration, an OIDC login icon will be displayed on the MrDoc login page:  Clicking it will redirect to the authentication address of the OIDC provider:  Enter the account information in the OIDC service to log in and be redirected back to MrDoc.
mrdoc
Sept. 29, 2026, 6:41 p.m.
Forward
Favorites
Last
Next
Scan the QR Code
Copy link
Scan the QR code to share.
Copy link
share
link
type
password
Update password
Validity period
Markdown file
Word document
PDF document (print)